 So, if you know me well you know I have a few weaknesses.
Rum (thanks Nannie for the introduction), Man Tracker (he's a real, manly man), a Big Mac and the Double Gut Bomb (not it's real name) burger from Dairy Queen. And since 3 of the 4 mentioned weaknesses can kill me if not consumed in moderation, I had to venture out and find my own way to make burgers that tasted great!
And let me tell you - I practiced for many years. I read everything I could on the internet - searching for the one key tip that I was missing. The one key that would catapult my burgers into burger stardom.
I tried big bugers (ha ha - spell check marked this one as spelled wrong, but I think I will keep it that way), little burgers (sliders, which are very fun in large groups with a dozen different toppings where you can proudly exclaim "I at 7 burgers last night" and know you didn't clog your arteries for real), burgers with egg, burgers with crumbs - burgers with egg and crumbs. *sigh*
I tried it all. And then while watching one of the many cooking shows I watch daily (hey, I work in a cable office - it's my JOB to watch TV all day) I put 1 and 1 together and came up with 6. Math was never my strong suit.
So, if you want to make a great burger - like a WOW your family, shock your neighbours, rock the nation burger - follow me on this tasty journey and enjoy the fruits of your ambition!
 The Better Burger
Makes: 14 kaiser sized burgers
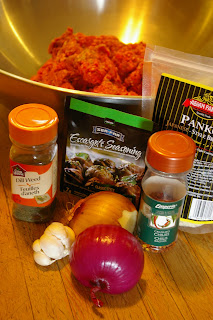
4 lbs lean ground beef
3/4 cup minced onion (any kind)
4 cloves minced garlic
1 7g package escargot seasoning
1/2 cup bread crumbs (optional, really!)
3 Tbsp dill
1 Tbsp crushed chilies

Begin by mincing the onion and the garlic. You'll notice I used 2 different kinds of onion. Use what you love best - it's all up to you!
Toss them into a large bowl, with the ground beef and mix-y, mix-y. Be brave - use your hands!
A tip - fill your sink with hot soapy water, so you've got somewhere to clean your hands when doing other tasks in the kitchen!
When well mixed - go ahead and add the remaining ingredients.
Mix again, until well blended.


Now it's time to portion your burgers!

I used a 2/3 cup measuring cup to get each pportion to approximatley the same size. These sizes work really well for the larger sized buns. For smallers buns, use a smaller cup to portion the beef mixture.
Just be sure to remember that the patties will shrink when cooked. Even with lean beef. So make your patties larger than the burger buns to begin with - the beef:bun ratio will work better that way!

OK - here's when I'm going to show you a few tricks. Anything that makes life easier and work faster is a huge PLUS in my book! So, you can pay me later for the news today!
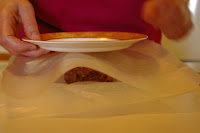
Grab yourself 2 plates. Not large dinner plates - but smaller, bread plates. Like you'd get at a coffee shop with your cookies or a muffin. I'm going to guess about 6" across?? Arm yourself with a couple of pieces of wax paper too - or parchement paper. Plastic wrap will also work, just not as well. But a bread bag cut open and into 2 pieces will get you cooking with gas!!

Put your plate down and cover with wax paper. Roll one portion of the beef into a nice, round ball (you can be fairly firm with it, and pack it like a snowball) and place the ball onto your wax paper.
 Cover with the other piece of wax paper, and then top it all off with the second plate.
See how the plates are both set to the same direction - as though you were going to stack them in the cupboard? Yay!

Then, with 2 hands placed in the middle of the plate (don't put pressure on the outside edges of the plate - you run the risk of cracking the top plate and THAT would be dangerous) give gentle, even - yet firm pressure down, to squish the ball of beef!

You're looking to get the patty to about 1/2 inch (go bigger if you feel the need, but you're going to have to cook longer).

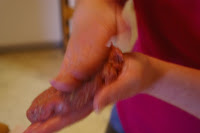
Remove top plate, peel off wax paper and VOILA!! Patty! Take a few moments to use your palms and thumbs and make sure the edges of the patty are well joined. Not super important, but it holds together better on the BBQ (sorry about the blurry photo - BBQ time usually includes a rum or beer and as you can tell - I was NOT running the camera that time).
The thumb print makes the middle of the burger cook without getting fat, and that in turn makes the burger cook at the same rate from the edges to the middle!
 Now, last tip - go ahead and give that burger patty a wee thumb print, right in the middle. Why, you gasp?? Well - burgers tend to 'fatten' up in the middle as they cook - making the outsides cook faster than the middle. You get a burned edge, a raw centre. And, even worse, the middle of the burger so much BIGGER and harder to get your lips around.
So - ready to start grilling?? Let's get the introductions out of the way first. Friends, meet Bernice. She's our newest addition (thanks Grandma and Grandpa) and was lovingly put together by Mr. Hungry and Unca Jay. We call her Bernie, for short. And hope she never does! Ha ha!
I grill on high for most everything. Burgers especially. Crank it up, and let it get nice and hot before you start! Oh, and never, EVER close the lid for burgers (or steaks, really). You want them grilled. Not boiled. :O)
 So, when she's good and hot - drop those bad boys onto the grill, grab yourself a cool glass of joy and sit back for a few minutes. You're notice we're doing some chicken too - special order for Grandpa!
After about 4-5 minutes, give the burgers a quarter turn. I warn you now - don't touch them before that or they will be falling apart before you know it!

After another 4-5 minutes, you will notice the juices starting to form pockets on the top of the burgers. Good sign! That means you've not messed with them (I swear, leave them alone as best you can - if you see fire, turn the heat down and use a spray bottle with water to put them out) and that they are ready to flip!

Carefully turn all burgers, and repeat the process of cook for 4-5 minutes, quarter turn and then cook for 4-5 minutes again - until they are done. If you've made thicker burgers it's going to take a bit longer to cook.
They are ready to go! Load them up your way, and you're not going to be unhappy! I promise!
Here's a few burgers from that night!
 Gran's burger. Plain by some standards, but a good burger won't need much fixings to make it terrific!
Hope you find the time to touch base with your primal side, and get to cooking ourdoors this summer!! It's a time we all enjoy!
--The Cook


No comments:
Post a Comment