

So.
Where do I begin??
I guess the beginning is the best place!
I have friends. Really. I do! Real friends. I have not had an imaginary friend since 1976, if ever. Will have to check with Mom on that one.....
I also have 'fake' friends. Now, these are not friends that just pretend to enjoy my company (although I'm not so vain as to believe that those kinds of friends don't actually exist) but friends have have on the intraweb.
They are real people. They have real lives. Kids too, for the most part. Families, friends (probably real, fake AND imaginary) and although we've never actually met - I consider them friends.
And one day, in my travels through 'fake' friend land, I came across a post about the Bacon Explosion. I was struck by lightening. Instantly. I mean....bacon + pork + bacon = pure bliss in my books! I mean - this was a movement! People all over the world are making these!! Love meatloaf? This thing is the KING of meatloaves!!
So began the hunt for the rules (ha, there are no rules but perhaps there SHOULD be rules....one day you will see) and the ideas. Struck by lightening - I was THUNDERED!!
So here is my venture into the land of the search for the Bacon Explosion. You can Google images for the Bacon Explosion if you want, but I promise you THIS journey will be well worth the time to stick around and witness!
Bacon Explosion
Makes: 1 football sized Bomb, or 2 Bombs the size of a large Guinea Pig
Note: we decided to make 2 smaller Bombs
 1 lb pork
1 lb sausage meat
2 lbs bacon
4-6 extra rashers of bacon
1 onion
1/2 sweet red pepper
1/2 sweet yellow pepper
1/2 green pepper
1 cup shredded Mozza cheese
1 c BBQ Sauce
1 tsp fennel
1 Tbsp chili powder
1 tsp thyme

Begin my chopping and frying the extra rashers of bacon until they are crispy. Remove from pan and reserve for use later.

Slice onion into thin pieces and In the same pan, saute until tender (about 5 minutes). Remove from pan and reserve for use later. You can put the onions and the bacon into the same dish.

In a large mixing bowl, mix together the pork, sausage and spices.
Divide the pork mixture into 2 equal halves, reserve 1 half for later.
Working on a large piece of parchment/wax paper, press the one half of pork mixture into a 1/2" thick square. Ours was about 10"x10"x1/2" when completed.
 Spread out the onion/bacon mixture being careful to keep a nice clean edge of the pork square.
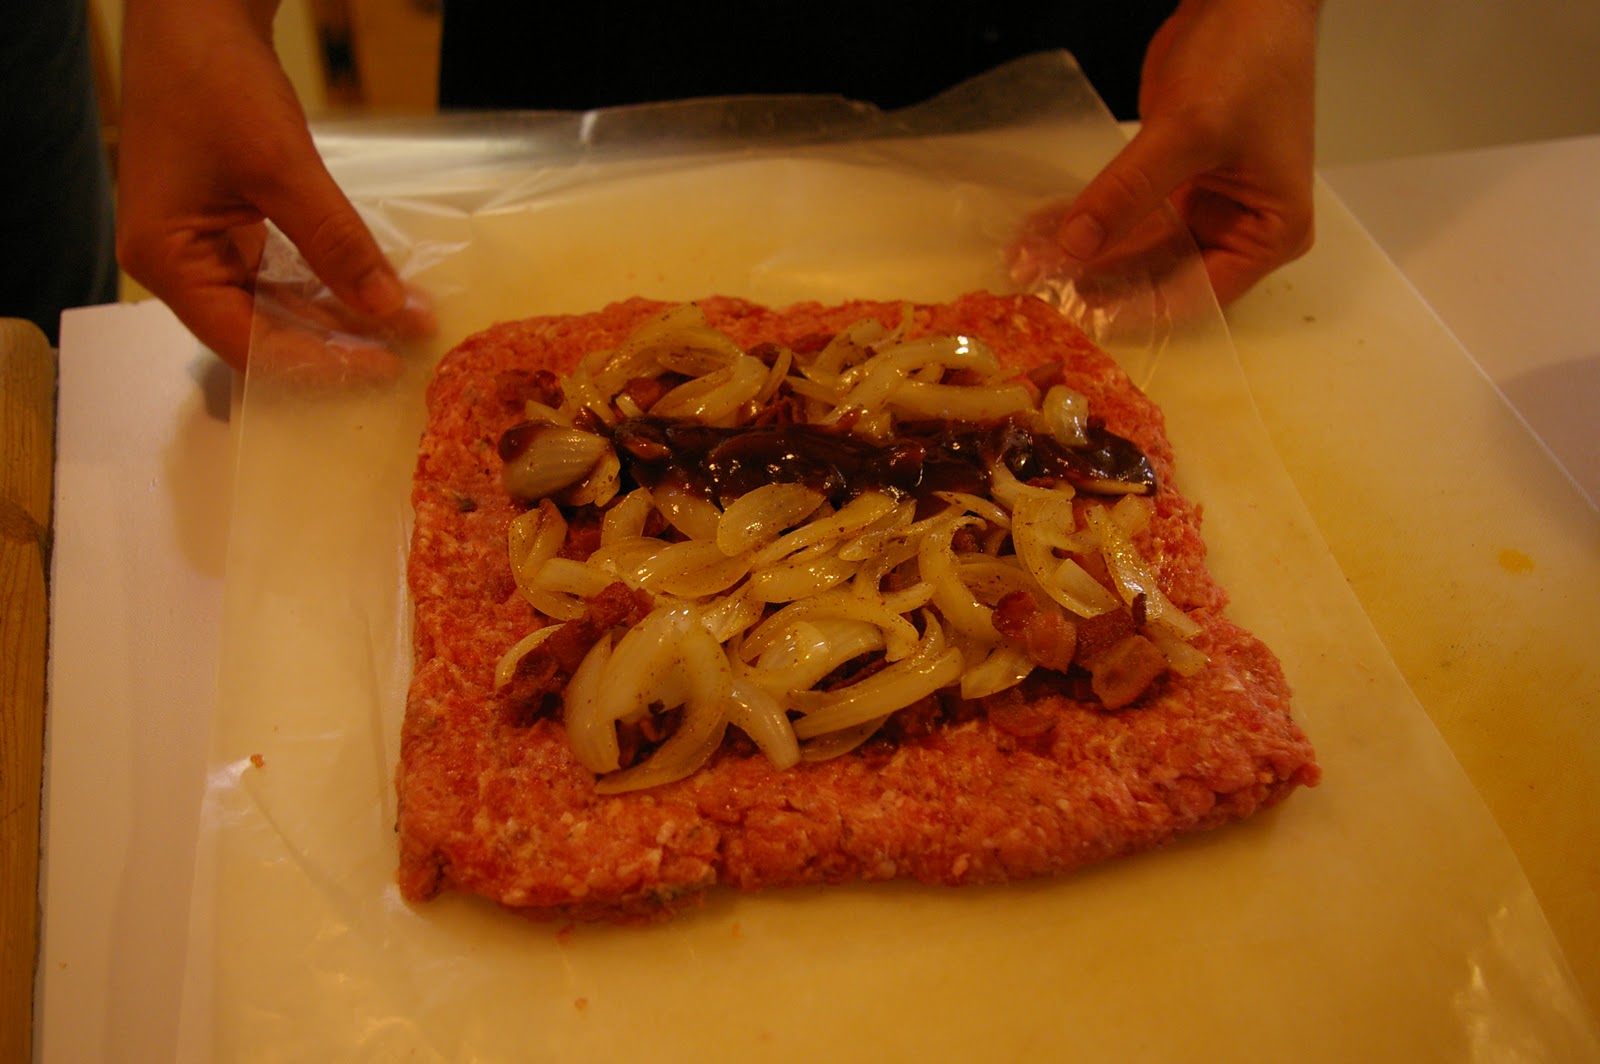
Top with BBQ Sauce.


Carefully roll into a log and pinch seams together to seal. I actually found the paper to be really helpful for this part of the recipe, and even left the log in the paper to put in the fridge to cool.
Cool for 1 hour to set.
Meanwhile, the fun REALLY begins!!

It's time for the bacon lattice! This will use 1 lb of bacon. When complete, this will look like the lattice that lays on top of a nice pie.....if I could MAKE pie. But if I could, man I'd have the MEANEST lattice on top!!
 Start by laying out a nice blanket of bacon, strips side-by-side, being careful to avoid overlapping the long sides of the bacon. This will be your side-y bacon's.
Lay another piece of bacon on top of your blanket, perpendicular to the first layer and near the edge. This will be your up-y bacon's. Take the 2nd, 4th & 6th side-y bacon and turn them back over your first up-y bacon. 1st, 3rd & 5th side-y bacon should still be on the paper.

Take another piece of bacon and lay it beside the first up-y bacon. Then lay the 2nd, 4th & 6th side-y bacon back down. Take the 1st, 3rd & 5th side-y bacon and turn it back over your 2nd up-y bacon. 2nd, 4th & 6th side-y bacon should still be on the paper.
You get the picture? Just keep repeating the cycle above until you have this really cool looking bacon lattice!! When you get all your pieces done, go back to your first up-y bacon and fix the end up to make it look nice and neat.

Now comes the fun part! And surprisingly, it's not that hard to do!! Bacon has this really great way of being really pliable when it's handled - and it can stretch and bend and conform as we need!

So grab your log of pork and lay it out (paper removed) on one side of your lattice. Carefully lift the edges of the lattice and begin rolling the log with the bacon. Make sure you end with the seam (where the 2 sides of the lattice meet/overlap) on the bottom. Tuck the edges into the log and WHA-LA!!

The second log we made was made with peppers and Mozza cheese plus BBQ Sauce. I sauteed the peppers for a bit before I rolled them up into the log to ensure they would be cooked when the Explosion was done.

The second half of pork was pressed out same as the first, and then filled with peppers and sprinkled with Mozza and finally dotted with BBQ Sauce. It was rolled the same way, lattice was made the same way.

The only difference was that when it was rolled into the lattice, it was rolled starting from the corner. The lattice looks neat this way too - and it was a simple way to tell the 2 apart while they were cooking.

OK. Time to cook! Jazz hands, for making it work!!
I'm sure these can be done in the oven. But we made these this summer - and having the oven on for ages was not an option. Besides - cooking on the BBQ means we get to sit outside with a rum and watch the world go by!!
So, preheated the BBQ to 350 degrees Fahrenheit and brought out the Bombs. Insert great movie sound effects here. Not spooky sounds. Mysterious sounds!!
 We want the Bomb to cook at 350 degrees Fahrenheit, but on an indirect heat. What? Huh?? Heat on one side of the BBQ, no heat on the other. So turn one side off!! But, after you put the Bomb onto the grill, because the heat from a hot grill will seal your edges perfectly!
So, Bombs into the BBQ. Heat maintaining at 350 - rum in hand. Chill. And chill some more. And even more. Because these things take a while to cook. You won't need to flip these treats - just rearrange on the grilll because if yours is like ours - it has hot spots and cool spots and everyone likes to dance the jig!!

Brush with BBQ sauce every so often if you wish.
Internally, you want the completed temperature to be 165 degrees. Technically that means you need to cook for about 1 hour per inch of Bomb.
So about 3-4 hours later, our Bacon Explosion was cooked!

We let ours rest for a short bit before diving in. The excitement could only be contained for so long!!

Bacon Explosion with Onion and Bacon

Bacon Explosion with Peppers and Cheese
They were great!! Really - you can fill these Bombs with WHATEVER you want! Use your imagination - go wild!!
Enjoy and go wild!! I want reports of what you're putting in your Explosion!!
--The Cook
On a side note, if you are actually considering making one of these, please wait for my next post before you undertake this experiment.
Turst me - you'll be GLAD you did!
No comments:
Post a Comment